


Real Estate Frames
Bulk Discount
3 - 5
12%
Off
6 - 11
16%
Off
12 - 47
20%
Off
48 or more
25%
Off
Size:
The size you would like to use.
Decorative Base:The decorative base slides over the post creating a unique, decorative look.
R1 Panel Style:The style of panel you would like to use for this frame.
Number and Width of Panels:The number and width of panels you would like to use for this frame.
Post Length:The overall height of the post. Posts over 8' must ship freight.
Arm Length:The total length of the post arm from which your sign hangs. The 36” arm can hold up to a 24” wide sign. The 47” arm can fit up to a 36” wide sign. See the image for the difference between fixed holes and sliding clips.
Cap Style:The cap style you would like to use.
Rider Clips:These two clips attach to the top of the post arm to hold small rider signs such as “Under Contract.” They can fit up to a 6mm thick rider sign.
Color:The color you would like to use.
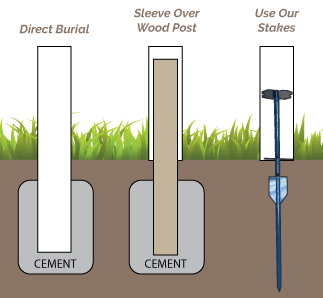
Installation Method:
The GroundBreaker stake is better for high wind/loose soil conditions, while the Powerstake is great for normal conditions. See image for a visual example.
The GroundBreaker stake is better for high wind/lose soil conditions while the Powerstake is great for normal conditions.
Stakes:One installation option is using GroundBreaker stakes. These are great for temporary or often moved frames.
Substrate Thickness:The thickness of the panel you will use with this frame.
Substrate Height:Your overall panel height.
Substrate Width:Your overall panel width.
Bottom Substrate Height:Your overall bottom panel height.
Top Substrate Height:Your overall top panel height.
Overall Substrate Width:Your overall panel width.
Post Length Options:The overall height of the post.
Frame Size:Size of street name insert that will slide into frame.
Bolt Length:Select length of bolts.
Substrate Size:The size you would like for the substrate.
Support Channel Size:The size you would like for the Support Channel. These are used on round poles to prevent rocking in the wind. Support Channel height typically matches the height of the sign.
Frame Style:The frame you would like to use.
Frame Size 1:The size you would like to use for the first frame.
Frame Size 2:The size you would like to use for the second frame.
Stop Sign:Select a stop sign to go with your post.
Hardware Kit:All necessary hardware is included.
Sign Backer Size:The size you would like for the Sign Backer. If your Stop Sign is 24", your backer should be 25". And if your Stop Sign is 30", your backer should be 31".
Bottom Rider:Select a bottom rider or none with your post.
Install Method:Choose between Grounbreaker Stakes or Frame Feet.
Post Type:The post you would like to use. Choose from square or semi-round.
Panel Size:The size of the panel you would like to use in HxW. Panel size larger than 36" must be shipped via freight.
Backer Shape:The shape of the backer you would like to use.
Style:The style you would like to use.
Bracket:The decorative bracket is made of powdercoated aluminum; it's included in the set or system.
Display Board:The display board measures 36 x 30 and comes with a Cork Insert Board.
Address Options:Select how you'd like to showcase your address. You can choose a hanging plate number or a number plate mounted at the top of the mailbox.
Decorative Bracket:You can add a white or black decorative bracket. This is installed under the arm. You cannot use the bracket together with the hanging plate number.
Customization:Enter your address in the given lines. You can use up to three lines. Leave blank any line you won't use.
Gauge & Alloy:Aluminum sheet or plate comes in either 0.063 or 0.080 gauge or thickness. Type of alloy used is 3105.
Holes:Your aluminum sheeting may come with or without holes.
Setup:Your reflective sheeting may come in single-sided or double-sided setup.
Reflective Sheeting & Color:The type of reflective material and color you'd like to use.
Plate & Font Size:The size of the plate and font you'd like to use. A 6" tall sign uses a 4" font while a 9" tall sign uses a 6" font.
Border:This street name sign has no border.
Border:This street name sign has no border.
Letter Case:The letter case you'd like to use. Choose all uppercase or a combination of uppercase and lowercase.
Send Proofing:We will send proofing before proceeding.
Arrow:Select the direction of the arrow for your sign.
Background Color:The background color for your sign.
Printed Color:The printed color for your sign.
Speed Limit:The speed limit you'd like to use.
Arm End Cap:The arm end cap you'd like to use. Choose from interior cap or exterior cap.
Mailbox Color:The color you would like to use.
Sign Width:The width of your sign. The distance or space between the posts and sign is 3" on each side or a total of 6".
Mailbox Size:The size of your mailbox. Standard size is 18 3/4" long, 8 3/4 ” high and 6 1/4" wide. Large size is 21" long, 11" high and 8 1/4” wide.
Free Shipping! Ships within the week.
Product Description
Made of 1x1 aluminum and are available with ground stakes, frame feet, or both options. Powder coated and available in different colors. These frames bolt together and ship unassembled...which will save you a ton of money on shipping.
Sign requirements:
The frame size denotes the actual size or your sign. For example, if you ordered a 18" tall x 24" wide frame, your sign should be exactly 18" tall x 24" wide. If your signs are bigger or smaller than that they will not work properly. Rider signs should be 6" tall by whatever width your frame is. You don't need any holes in your signs. Stock frames are designed to hold 4 mm coroplast or 3 mm (1/8") Aluminum Composite Material (AKA, Dibond, ACM) or any other substrate less than 4 mm thick. We can custom make these frames to hold different sized signs and substrates so we can probably accommodate you if you have different requirements.
Colors:
We can powder coat these frames black, white, grey, blue, red, and custom colors. We keep stock of the most popular sizes in black and white. Other sizes and colors require some time for fabrication. here is a list of stock sizes
18" tall x 24" wide with and without bottom rider. Black and White
24" tall x 24" wide with and without bottom rider. Black and White.
Assembly and installation
We strongly encourage to watch the video as the installation and assembly instructions below will make a lot more sense and assembly will be a piece of cake. These frames are simple to put together and and only require 4 bolts for the standard frames, 6 bolts if you add the bottom rider. You will need a standard screwdriver (or a drill is faster) with a Phillips head (medium or large + shape) or a Robertson (medium square head).
Assemble the Frame
- Remove the bolts from the ends of the rails and posts (if they are still attached)
- Attach the bottom rail to one of the side posts - Insert the rail in the the bottom square hole of the vertical post, insert the bolt through the hole on the back side of the post and thread it into the end of the bottom rail. Tighten completely. If your frame has a bottom rider you will need to add both rails and tighten them completely. The slot should be facing up on both rails.
- Attach the other post to the the bottom rail - but do not tighten the bolt yet, leave it loose. If you have a bottom rider do the same with both rails, just get the bolts started and leave them loose so this post can pivot out of the way for the next step.
- Insert the main sign panel into the bottom rail and side post (the one that is firmly attached). When the sign is in the right place pivot the loose post into place and tighten the bolt(s) completely. The main sign panel should now be held firmly on three sides. If you have a bottom rider sign don't put it into the frame during this step as rider signs are designed to slide into place later on after the frame is assembled.
- Add the top rail and tighten the bolts completely. Your frame should now be assembled with the main sign panel firmly in place.
Inserting the bottom rider. (If your frame has a bottom rider slot). The slide-in bottom rider slots are designed so you can quickly change the signs without any tools.
- Slide the rider sign into one side of the frame, pivot the sign sign and slide it into the other side of the frame, center the sign and let it drop into place.
- insert the frame clips into the frame above the rider sign to keep it firmly in place.
- To change the rider remove the plastic frame clips, and then follow the above steps in reverse.
Installing the frame in the ground (if your frame came with ground stakes).
CAUTION: HAVE ALL UNDERGROUND UTILITIES MARKED BEFORE INSTALLATION
- Assemble the frame first
- Pound the ground stakes into the ground. HINT: it is easiest to use your assembled frame as a template to identify the exact location for each ground stake.
- slide the assembled frame over the ground stakes
- ANOTHER HINT for installing ground stakes into frozen ground. Use a cordless drill with a 3/4" spade bit and pre-drill holes into the frozen ground where your stakes are going to go.
- AND YET ANOTHER HINT for Removing stubborn ground stakes. This tool is awesome and was designed to remove ground stakes easily without damaging them. this is a good investment if you installing and removing a lot of sign frames and sign posts as you won't be replacing damaged stakes all the time. There is a less expensive hack that you can try that requires a car jack and a pipe wrench. This works well if you only need to remove stubborn stakes once in a while. Just Google "remove stakes with pipe wrench and jack" and you can see how it is done.
Frame Feet.
The frames are designed to be used with either ground stakes or frame feet. Align the the snap button on the frame feet with the holes on the bottoms of the frame and snap them into place. The feet can be removed by pressing the snap button and pulling the feet out of the frame.
Top Sign Rider Options:
- Included - Coro pins for 4 mm coroplast rider signs. A pair are included with the each frame. These pins screw into threaded inserts on the top of the frame, and your 4 mm coroplast sign slides over the pins (kind of like the wire step stakes for yard signs. these only work with 4 mm coroplast signs).
- Optional - Sign Rider Clips. These can be screwed to the top of the frame and will hold sign substrates up 1/4 inch (6 mm) thick, you will need these for Aluminum Composite material top rider signs or any other substrate up to 6 mm thick.
Product Reviews
There are currently no reviews for this product. Pease write a review by clicking the button below.
Write a Review

Write a Review